Exploration and Secrets Guide — Finding Everything in Arkham
How to explore flooded Arkham thoroughly in The Sinking City 2 — scavenging tips, hidden routes, optional lore, and rewards for the curious.

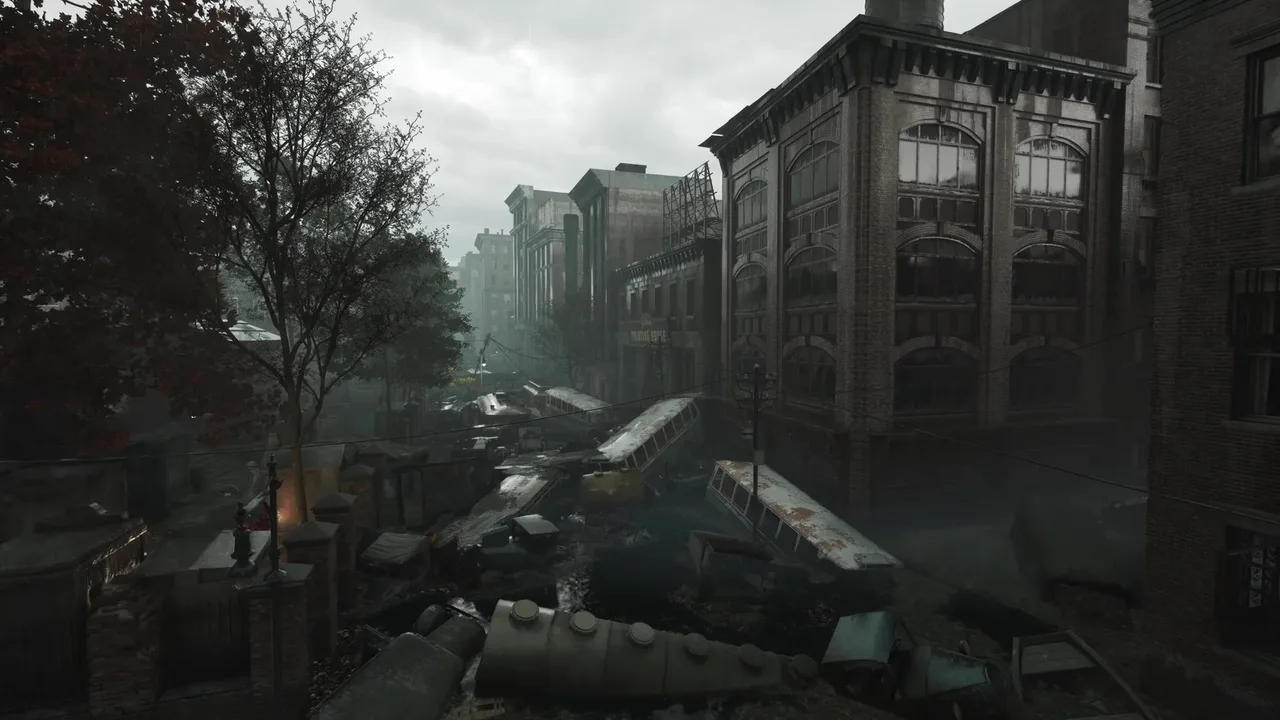
Arkham doesn’t give up its secrets easily. The flooded city is dense with detail — every waterlogged building, every half-submerged alley, every room with the door slightly ajar has the potential to hold something worth finding. The Sinking City 2 rewards players who look past the obvious path and push into the spaces the game doesn’t point you toward.
This isn’t just about completionism. In a survival horror game where every bullet and bandage matters, the difference between a player who searches thoroughly and one who sprints from objective to objective can be five extra shotgun shells, a healing kit, or a hidden passage that avoids a fight entirely. Curiosity isn’t a luxury here. It’s a survival strategy.
The Philosophy of Exploration in TSC2
The Sinking City 2’s semi-open world is structured around districts — flooded zones of Arkham that you reach by boat and explore on foot. Each district has a critical path that moves the story forward, but the actual space of each area extends well beyond that path.
Frogwares has built these spaces to reward deviation. Turn left instead of right. Open the door the game doesn’t highlight. Wade into the flooded basement. Check behind the counter. The design language is consistent: if an area exists and you can reach it, there’s usually a reason.
That said, the game doesn’t hold your hand. There’s no percentage tracker telling you how much of a district you’ve cleared. No collectible counter in the corner of the screen. The reward for finding something is the thing itself — supplies, information, a safer route — not a checkbox.
Scavenging: The Basics
Resource scavenging is the most immediately practical reason to explore thoroughly. The Sinking City 2 keeps you hungry for supplies, and the critical path alone won’t keep your inventory stocked. Here’s what to look for and where to find it:
Ammunition. Bullets are scattered in small quantities — a few rounds in a desk drawer, a partial box on a shelf, loose cartridges in a dead person’s pockets. You’ll rarely find large stockpiles. The game distributes ammunition in drips, which means every room you skip is potential firepower lost.
Healing supplies. Bandages, medical kits, and whatever else Frogwares includes in the healing toolkit follow the same distribution pattern — small amounts, widely scattered. Checking bathrooms, medical offices, and first aid stations within buildings tends to yield results. For a deeper look at managing your supplies, see the resource management guide.
Crafting materials. The game’s crafting system (details still emerging as of pre-release) uses gathered components to create or improve items. These materials appear in toolboxes, workshops, storage rooms, and scattered across workbenches — the kinds of places you’d expect to find useful components in a deteriorating 1920s city.
Key items. Some exploration yields items that unlock further exploration — keys, tools, codes. A locked door on the second floor might open with a key found in the flooded basement. These create small puzzles within the larger exploration space, rewarding players who investigate thoroughly rather than giving up when a door doesn’t open immediately.
| Resource | Common Locations | Search Priority |
|---|---|---|
| Ammunition | Desks, drawers, bodies, locked cabinets | High — every round matters |
| Healing supplies | Bathrooms, medical areas, first aid kits | High — you’ll need these |
| Crafting materials | Workshops, toolboxes, storage rooms | Medium — builds long-term advantage |
| Key items | Hidden spots, adjacent rooms, environmental puzzles | Varies — context-dependent |
| Lore documents | Offices, personal quarters, pinned notes | Low survival value, high story value |
Hidden Routes and Alternate Paths
One of The Sinking City 2’s most satisfying exploration rewards is the discovery of hidden routes — passages that let you bypass encounters, access new areas, or reach your objective through a completely different approach.
Based on the demo and preview materials, hidden routes take several forms:
Structural shortcuts. Collapsed walls, broken floors, and damaged ceilings create openings that connect rooms and floors in ways the original building layout didn’t intend. A hole in a wall might let you skip an entire hallway of enemies. A collapsed floor might drop you into a room with a direct exit to the dock.
Flooded passages. The water that drowns Arkham also creates navigation opportunities. Submerged doorways, flooded tunnels, and underwater gaps between buildings can be traversed if you’re willing to go through the water. These passages often connect areas that seem isolated from each other on the surface.
Environmental puzzle gates. Some routes are hidden behind light puzzle mechanics — moving an obstacle, finding the right valve to drain a room, cutting power to a locked door. These aren’t brain-teasers in the traditional sense; they’re observation challenges that reward you for noticing the environment.
Investigation-revealed paths. The investigation system can point you toward hidden routes through deductions made on the case board. Connecting the right clues might reveal that a specific wall is breakable, a specific passage exists, or a specific NPC can grant you access to a shortcut. This creates a meaningful overlap between investigation and exploration — the detective work literally opens up the map.
Reading the Environment
Thorough exploration in The Sinking City 2 isn’t just about opening every drawer. It’s about reading the environment — noticing details that suggest there’s more to find.
Water stains and tide lines. In a flooded city, water marks tell you a story. A room with tide lines well above the current water level means the water was once higher — and anything above that line has been untouched since. Look for supplies and documents in elevated positions within flooded rooms.
Sound cues. Frogwares’ sound design is deliberate. The sound of dripping behind a wall might indicate a hidden space. The distant clatter of something falling could mean a nearby room has shifted or opened. Ambient audio isn’t random — it’s information.
Light sources. In the pervasive darkness of Arkham’s interiors, light stands out. A candle still burning, a flashlight beam visible under a door, electrical light from a functioning fixture — these are beacons. They usually indicate a point of interest, whether it’s a supply cache, a clue, an NPC, or a threat.
Disturbed environments. Furniture pushed aside, doors left ajar, drag marks on the floor — these signs suggest someone or something has been through recently. Following these environmental narratives often leads to encounters (not always friendly) or to areas with fresh supplies.
Architectural oddities. Rooms that seem too small for the building they’re in. Walls that don’t align. Doors that should be there but aren’t. The level design in the demo contains moments where the architecture subtly signals that there’s something hidden. Train yourself to notice when a space doesn’t make sense — it probably means there’s a way in that you haven’t found yet.
Optional Lore and World-Building
Not every exploration reward is mechanical. A significant portion of what you find off the beaten path in The Sinking City 2 is lore — documents, environmental storytelling, and narrative fragments that flesh out Arkham and the forces at work within it.
Personal documents. Letters, diaries, and notes from Arkham’s residents before and during the flood. These humanize the city and provide context for the horror — it’s one thing to see a drowned neighborhood, another to read a letter from someone who lived there and knew something was wrong.
Institutional records. Hospital files, police reports, university correspondence. Arkham’s institutions have histories that intersect with the supernatural crisis, and their paper trails survive in filing cabinets and offices throughout the city.
Ritual and occult materials. Deeper into the lore, you’ll find evidence of the cults, rituals, and eldritch forces behind the flood. These documents often tie into the investigation system — finding an occult text might add a clue to your case board that unlocks a deduction about what’s really happening.
Environmental storytelling. Not everything is written down. The arrangement of objects in a room, the state of a body, the presence of symbols on walls — these tell stories without words. Frogwares has a strong track record with environmental narrative, and the demo suggests they’ve leaned into it heavily here.
For players who care about Lovecraftian mythology, this lore layer is where the game’s literary DNA is most visible. Arkham’s history with the Mythos — Miskatonic University, the deep history of the coast, the families and factions entangled with things from beyond — runs through the documents and details you find while exploring.
The Flood as Exploration Mechanic
The flood system deserves special attention in the context of exploration because it directly determines what you can and cannot access at any given time.
Water levels shift dynamically across Arkham’s districts. When levels rise, ground-floor areas may flood — pushing you upward, blocking passages, and potentially sweeping away items. When levels drop, previously submerged spaces become accessible — revealing rooms, corridors, and entire sections that were hidden under water.
This creates a rhythm of revisitation. A district you’ve already explored might yield new discoveries after the flood shifts. A room you noted but couldn’t enter because it was underwater might drain, revealing supplies or clues. Keeping mental (or physical — the in-game map helps) notes of areas you couldn’t access is valuable.
The flood also creates time-sensitive exploration opportunities. If water levels are shifting and a space is temporarily accessible, you might have a limited window to explore it before conditions change again. This adds urgency to exploration without making it frantic — you have time to be thorough, but you can’t procrastinate indefinitely.
Practical Exploration Habits
Some concrete habits that’ll serve you well across Arkham:
Clear threats before searching. Nothing ruins a careful search like getting ambushed while you’re reading a document. When entering a new area, deal with any visible threats first, then explore at your leisure. Half-measures — searching while an enemy is still active nearby — tend to end with you taking damage you didn’t need to take.
Develop a sweep pattern. When entering a room, move systematically. Left to right, or clockwise, or whatever feels natural — the point is to have a consistent method so you don’t miss corners. Haphazard searching leaves gaps.
Check above and below. Shelves, high cabinets, the tops of wardrobes — supplies are placed at different heights. Similarly, check under tables, beds, and desks. The game rewards three-dimensional awareness.
Return to previously explored areas. After flood changes, after gaining new tools or keys, after completing investigation deductions — all of these can open up previously inaccessible content in areas you’ve already visited. Don’t treat explored districts as done.
Use the boat for peripheral exploration. Before docking at the obvious point, take the boat along the edges of a district. You might spot alternate docking points, visible items through windows, or passages you’d miss from the main approach. The boat navigation guide covers waterborne exploration in more detail.
Balance thoroughness with survival. Searching every room is ideal, but not if it costs you resources faster than you’re finding them. If an area is heavily populated with enemies and your supplies are low, mark it for later and come back when you’re better stocked. The best exploration is patient exploration.
What Completionists Should Know
If you’re the type who wants to find everything — every document, every supply cache, every hidden room — The Sinking City 2 is built for you, but it won’t make it easy.
The game doesn’t track your completion percentage per district (at least not visibly, based on the demo). There’s no map overlay showing which rooms you’ve cleared. The satisfaction comes from the discoveries themselves, not from watching a counter tick upward.
That said, the investigation system’s case board serves as an indirect progress tracker. If you’re finding clues and making deductions, you’re exploring thoroughly. Gaps on the board tell you that there’s more to find, even if they don’t tell you exactly where.
Expect multiple playthroughs to reveal things you missed. The flood’s dynamic nature, the branching routes created by investigation deductions, and the sheer density of Arkham’s environments all but guarantee that your first time through a district won’t be your most complete. That’s not a failure — that’s the game working as designed.
Arkham is a drowned city full of drowned secrets. Finding them all is the work of someone obsessive, patient, and a little bit mad. Fitting, given the source material.
Frequently asked questions
Are there hidden areas in The Sinking City 2?
Yes. Arkham's flooded districts contain hidden routes, sealed rooms, submerged passages, and optional areas that reward thorough exploration with supplies, lore, and investigation clues.
What do you get for exploring thoroughly in The Sinking City 2?
Thorough exploration rewards you with ammunition, crafting materials, healing supplies, investigation clues for the optional case board, lore documents that flesh out Arkham's story, and alternate routes that can bypass dangerous encounters.
How does the flood affect exploration in The Sinking City 2?
Water levels shift dynamically, opening and closing passages. Areas that were submerged may become accessible when water recedes, revealing new rooms, items, and secrets. Revisiting districts after flood changes is key to finding everything.